There are many
different styles of feeders for nuts and seed. Generally,
you choose whatever you like the best! There are, however,
a few points that are worth considering.
The materials used
in the construction of a typical feeder could have a significant
impact on how easy it is to keep it clean and how long it
lasts. Some are made entirely of metal and can withstand vigorous
cleaning methods so are easy to maintain. The 'cage' types
come in a variety of shapes - cones, balls and more elaborate
designs - that cannot be disassembled but a good going over
with boiling water and a brush followed by a disinfectant
rinse does the job nicely. The 'traditional' style can normally
be taken apart for cleaning in the same way as the plastic
ones and should be treated accordingly. Be well warned that
some traditional styles may look like metal may but are actually
made of 'chromed' plastic! Be sure that is metal before using
the boiling water.
More common, and cheaper, are all-plastic seed feeders. These
do not last as long as the metal types as the plastics use
do deteriorate with age. They also need more care when cleaning
as they really must be taken apart to do the job properly.
Peanut feeders
There are good designs and poor designs. I don't wish to upset
manufacturers but some of their products are definitely not
well thought out. The following images are of the latter variety
- one of the commonest designs available.
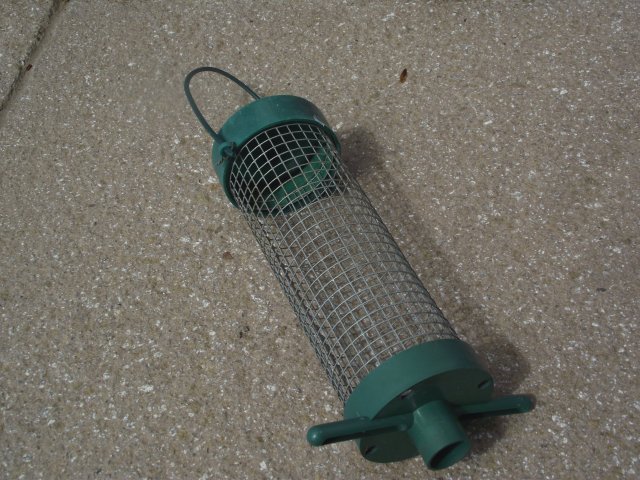
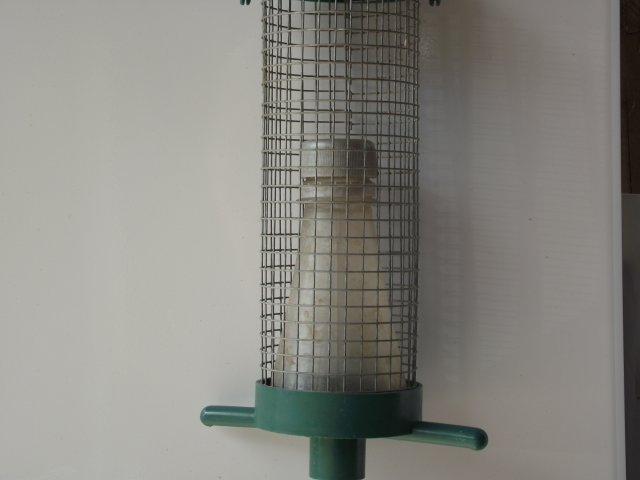
The first image shows the feeder as it comes. The mesh fits
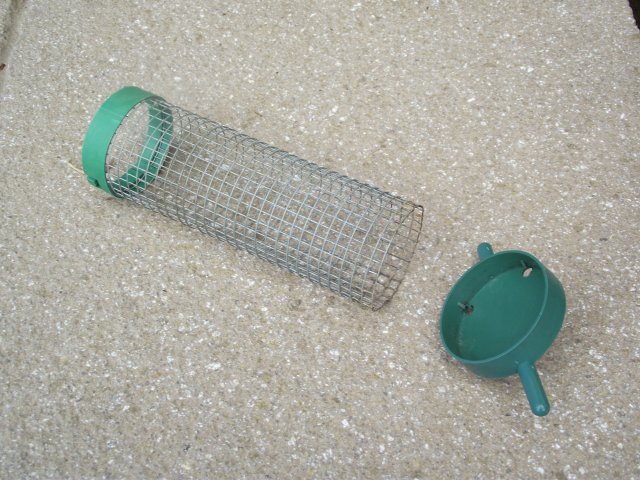
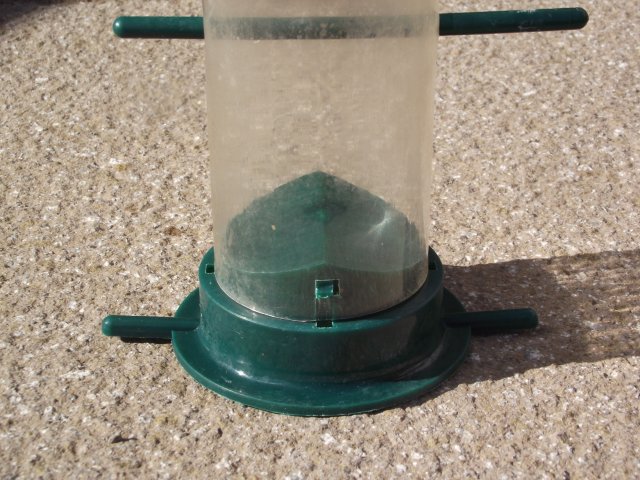
inside the base, usually clipped in four places. The base,
however, is a cup as seen in the second image. Peanuts lying
in the base can not be reached by feeding birds so, if left,
will soon form a solid mass that will harbour fungus, mould
or parasites. These feeders are very difficult to disassemble
for cleaning but they do have to be taken apart for them to
be cleaned properly. A small screwdriver can be inserted through
the holes in the base to catch the edge of the mesh and prise
it off the clips. This will probably distort the mesh so care
must be taken when reassembling to ensure that a good section
of the mesh engages with the clips. A feeder of this type
is not one that can be recommended. However, there is one
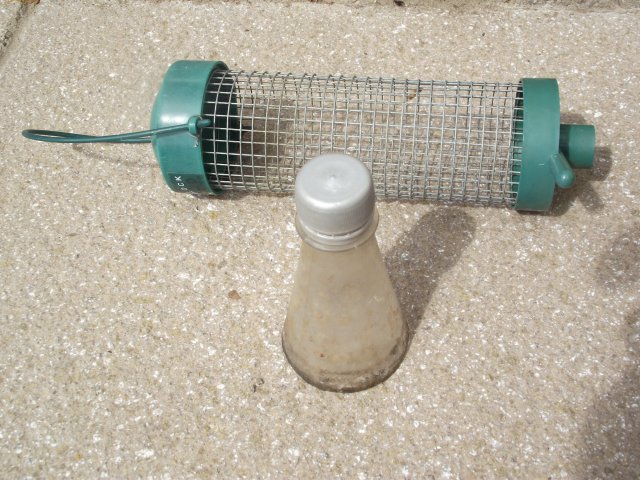
trick that can be used. The third image shows a portion of
a plastic bottle top that has been cut to give a tight fit
inside the feeder mesh. Note that the bottle cap has been
retained! The final image shows the feeder with the bottle
top fitted in place. This ensures that peanuts are forced
to the outside of the feeder, where the birds can easily reach
them, and do not go in to the cupped base of the feeder. It
isn't a foolproof solution but it certainly helps!
 A
better design has a wedge shaped base to divert the peanuts
to the outside.Although this image shows a seed feeder there
are peanut feeders using the same style. The wedge is seldom
peaked enough to do the job properly but it is still a big
improvement over the previous design. Again, the mesh may
be attached to the base by clips - but they are on the outside
so easily reached - or they may be joined by a simple 'push-through'
rod that also serves as a perch. This is, by far, the easiest
type to disassemble for cleaning. The plastic rod will inevitable
break eventually - but a four-inch nail makes a good substitute!
A
better design has a wedge shaped base to divert the peanuts
to the outside.Although this image shows a seed feeder there
are peanut feeders using the same style. The wedge is seldom
peaked enough to do the job properly but it is still a big
improvement over the previous design. Again, the mesh may
be attached to the base by clips - but they are on the outside
so easily reached - or they may be joined by a simple 'push-through'
rod that also serves as a perch. This is, by far, the easiest
type to disassemble for cleaning. The plastic rod will inevitable
break eventually - but a four-inch nail makes a good substitute!
Seed feeders
Basically there are two types - one for nyjer (or niger) seed
and one for mixed seed.The nyjer seed feeder is simply a plastic
tube with small slots for the birds to extract the seed. Generally,
the tube is simply clipped to the base in two to four places
although the clips may be inside or outside the base. A small,
thin screwdriver will suffice to lift the plastic tube gently
off the clips - the tube plastic is usually flexible enough
to clear the clips without splitting. Disassembly is thus
normally a simple task.
The mixed seed
feeders are less easy. They have two or more pairs of apertures
for the birds to get at the seed. To clean them properly almost
always involves disassembly - and therein lies the problem.
In a 'good' design the two opposing apertures are joined by
a very small screw (usually a cross-point). Once the screw
is removed the two apertures can also be detached from the
tube. Like the nyjer type, the tube may be attached to the
base by clips although occasionally the rod method can be
found. The real fiddly part, though, is getting the screw
back in! Alas, many do not have the opposing apertures joined
by a screw and are simply welded together. It is all but impossible
to disassemble this type and, should you succeed, you may
find you cannot put it back together again! For this type,
removing the top and base for access and then scrubbing with
a long reach bottle-brush is really the only answer.
Fat Ball Feeders
The commonest type is a simple 'cage', available in two
sizes, to suit either the standard 'small' fat balls or the
large ones. These are really suited ONLY for fat balls that
are enclosed in netting. It can be useful to install a wire
inside the cage and thread the netting on to this wire - it
makes it easier to remove the netting once the ball has been
consumed.
Many of us buy
a tub of 50 fat balls. It is generally cheaper and you get
a useful bucket with them. However, the most common tubs have
fat balls that are NOT netted. If you use these in a 'cage'
feeder then they will fall through long before the ball is
consumed. These tubs normally are of the smaller type balls
so you can actually place them inside a peanut feeder - they
won't fall through but you may have problems in cleaning the
feeder.
There is some controversy
over the netting on fat balls. One school of thought is that
there is a high risk of birds getting claws caught in the
netting and most organisations recommend against their use.
However, despite some research, I have never encountered such
an incident and have yet to find a fully documented case of
that actually happening! The case is out - but the risk must
be exceedingly small.
Feeder care
No matter
the type, a feeder should be disassembled as far as possible
(and preferably completely disassembled) before cleaning.
Cleaning usually involves a stiff brush and plenty of water,
adding detergent where necessary. You should scrub thoroughly
until no trace of any debris remains. Rinse all parts thoroughly
with clean fresh water and then rinse again using a disinfectant
mix. You can buy dedicated disinfectant but a simple mix of
one part of household bleach to 20 parts of water will do
the same job at a fraction of the price! Allow all parts to
dry thoroughly and then reassemble the feeder. Rather than
pouring your leftover disinfectant down the drain, why not
dispose of it underneath where your feeder was hanging to
disinfect the ground too?
Always check your
feeders frequently to ensure the contents are in good condition.
Particularly in wet weather, damp nuts or seeds can quickly
become a solid mass and can become mouldy. If weather is warm
as well as wet, germination of seeds can also occur. If your
nuts or seed go into a solid mass, become mouldy or start
to germinate then you should discard them immediately and
do a thorough clean of the feeder before putting it back out
and, when you do so, only put out a small quantity of food.
If clean food isn't being eaten then your birds may have opted
for some other type of food. Don't leave your feeder out in
hope, take the feeder down and try something else instead,
again only a small quantity. To reduce the possible spread
of disease, you should move the feeders to different locations
(ideally more than 6ft apart) periodically. If your hanging
points are limited and you have a few feeders, try leaving
one point vacant at a time and rotate at intervals.
There is ongoing
debate as to whether or not to feed birds during the breeding
season. The argument against is the fear that a bird may try
feeding something like a peanut to its young, causing it to
choke. There seems to be no actual record of this having ever
happened. On the other hand, there is plenty of evidence that
birds continue to feed their young with exactly the food they
should but the adults will do a brief stop at feeders for
a quick, much needed 'refuel' for themselves. The advice from
ALL the bird organisations is to continue to feed all year
round but perhaps reducing the quantity until the young birds
have left the nests.
A few golden
rules:
- do
not put out more food than is being eaten within a few days.
It will go 'off', possibly with seed germinating but certainly
with moulds forming, so little & often is the way to go.
- choose
your site with care. The two main predators that know only
too well that feeders make for easy pickings are cats and
sparrowhawks. To avoid cats, place your feeders where there
is plenty of open ground around them so that the birds can
see approaching cats. But also place them where there is as
clear a view of the sky as possible and some nearby cover
(trees or shrubs) so the birds can see sparrowhawks coming
and have somewhere to dive into for safety.
Nest
boxes